Menu

FuseBeads Hub © 2026

Animal Fuse Bead Patterns: 15 Cute Designs for Crafters

Discover 15 adorable animal fuse bead patterns for cats, dogs, pandas, and birds. Includes difficulty levels, materials, and step-by-step tips for perfect results.

Iniciante5 min read de leitura

Why Animal Fuse Bead Patterns Are Perfect for Every Crafter

Animal fuse bead patterns are a wonderful way to combine creativity with cuteness. Whether you're a beginner looking for a simple project or an experienced crafter seeking a challenge, animal designs offer something for everyone. From playful kittens to majestic birds, these patterns allow you to create charming pixel art that can be turned into keychains, magnets, coasters, and more. If you're new to the craft, start with our beginner's guide to learn the basics before diving into these designs. One of the best things about animal patterns is their versatility. You can adapt them to different sizes, color palettes, and even 3D structures. For example, a simple cat pattern can become a flat coaster or a 3D figure with the right techniques. Our 3D fuse bead tutorial shows you how to take your animal designs to the next level. Plus, animal motifs are universally loved, making them perfect for gifts, decorations, or personal collections. In this article, we've curated 15 animal fuse bead patterns across four popular categories: cats, dogs, pandas, and birds. Each pattern is rated by difficulty, so you can choose the right project for your skill level. We'll also share material lists, ironing tips, and creative ways to use your finished pieces. Let's get started!

Essential Materials and Tools for Animal Fuse Bead Projects

Before you start any animal fuse bead pattern, gather the right supplies. You'll need fuse beads (also known as Perler, Hama, or Artkal beads) in a variety of colors. For animal designs, having a good range of neutrals—black, white, gray, brown—plus accent colors like pink, orange, and blue is essential. A standard pegboard (square or circular) is your canvas, and parchment paper protects your iron. Tweezers help place tiny beads accurately, especially for detailed eyes and noses. For a full list of recommended tools, check out our fuse bead tools guide. Color selection can make or break your animal pattern. Our fuse bead color guide explains how to choose shades that blend well and create depth. For example, using three shades of gray for a panda gives it a more realistic look than just black and white. Similarly, layering browns and tans for a dog's fur adds dimension. Don't be afraid to experiment with different brands, but keep in mind that bead sizes can vary slightly between manufacturers. If you're curious about the differences, read our Perler vs Hama vs Artkal comparison. Safety is paramount, especially if you're crafting with kids. Always use an iron on a heat-safe surface, and never leave children unsupervised during ironing. Our guide to fuse beads safety for kids covers everything you need to know. Finally, consider storage: keeping beads organized by color in labeled containers will save you time and frustration. Our storage tips will help you set up an efficient system.
Essential Materials and Tools for Animal Fuse Bead Projects

15 Cute Animal Fuse Bead Patterns by Difficulty

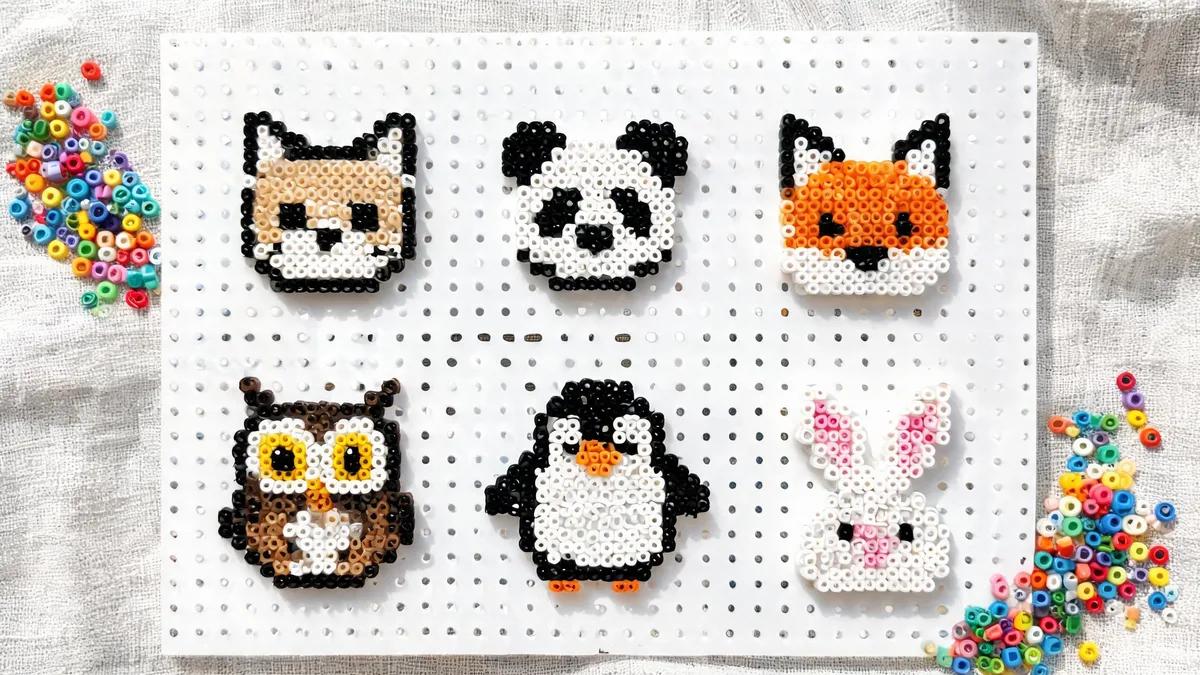
We've organized our 15 animal patterns into four categories, each with a difficulty rating: Beginner (★), Intermediate (★★), and Advanced (★★★). Remember, these are guidelines—feel free to adjust based on your comfort level. **Cats (5 patterns)** 1. **Simple Cat Face (★)** – A round face with triangle ears, using 5-6 colors. Perfect for keychains. See our keychain guide for assembly. 2. **Sitting Cat (★★)** – Full body with tail, requires 8-10 colors and careful shading. 3. **Cat Paw Print (★)** – A single paw with four toes, great for magnets. 4. **Sleeping Cat (★★)** – Curled up cat with closed eyes, uses gradient grays. 5. **Cat with Yarn Ball (★★★)** – Detailed scene with multiple elements. **Dogs (4 patterns)** 6. **Puppy Face (★)** – Floppy ears and a tongue, 6 colors. 7. **Dachshund (★★)** – Long body, short legs, needs precise bead placement. 8. **Dog Bone (★)** – Simple accessory pattern, can be paired with any dog design. 9. **Golden Retriever (★★★)** – Realistic fur texture using multiple browns and golds. **Pandas (3 patterns)** 10. **Panda Head (★)** – Classic black and white, easy for beginners. 11. **Panda Eating Bamboo (★★)** – Adds green bamboo stalks. 12. **Panda Family (★★★)** – Three pandas of different sizes, a lovely wall art project. **Birds (3 patterns)** 13. **Little Bird (★)** – Simple round body, 4 colors. 14. **Owl (★★)** – Big eyes and feather details, popular for ornaments. 15. **Parrot (★★★)** – Vibrant colors and intricate wing patterns. For more inspiration, browse our animal ideas and cool designs pages. Each pattern can be scaled up or down by adjusting bead count, but keep in mind that very small designs may be fragile.

Step-by-Step: How to Iron and Finish Your Animal Designs

Once your animal pattern is laid out on the pegboard, it's time to fuse the beads. Set your iron to medium heat (no steam) and let it warm up. Place a piece of parchment paper over the design, then gently press the iron onto the paper in circular motions for about 10-15 seconds. Lift the paper to check if the beads have fused together. If not, repeat. Be careful not to over-iron, or the beads will flatten and lose their pixelated charm. For a detailed walkthrough, see our how to iron fuse beads guide. After ironing one side, let it cool completely before flipping and ironing the other side. This ensures even fusing and prevents warping. For 3D projects, you may only need to fuse one side. Once cooled, your animal design is ready to use. You can attach a keychain ring, glue a magnet to the back, or frame it as a coaster. Our coaster guide offers great tips for functional items. If you're making jewelry, consider turning small animal patterns into earrings. Our earring and jewelry guide shows you how to add earring hooks and other findings. For gift-giving, animal designs make thoughtful presents. Check out our gift ideas for more inspiration. And if you want to display your creations, a photo frame or wall art arrangement can showcase your collection beautifully.
Step-by-Step: How to Iron and Finish Your Animal Designs

Creative Ways to Use Your Animal Fuse Bead Creations

Your finished animal fuse bead patterns can be used in countless ways. Keychains are a classic choice—attach a ring and clip them to backpacks or keys. Magnets are another favorite: glue a small magnet to the back and display your animals on the fridge. For a more functional item, turn a pattern into a coaster by making it larger and ironing both sides thoroughly. Our coaster applications page has more ideas. Seasonal decorations are also popular. Animal ornaments can hang on a Christmas tree or a mobile. Our Christmas ornament guide shows you how to add ribbons and hooks. If you enjoy interactive crafts, consider making fidget toys. Our fidget toy guide explains how to create movable parts. And for a personal touch, animal patterns can be framed as wall art or given as gifts. Don't forget about storage and organization for your finished pieces. A bead organizer or a shadow box can keep them safe and dust-free. If you're looking for more project ideas, our things to make with Perler beads article is packed with inspiration. Whether you keep them or give them away, your animal creations will bring joy.

Tips for Perfect Animal Fuse Bead Patterns Every Time

To ensure your animal patterns turn out beautifully, follow these tips. First, always work on a flat, stable surface. A slight bump can shift beads and ruin your design. Second, use tweezers for precise placement, especially for small details like eyes and whiskers. Third, keep a reference image nearby—it helps with color accuracy and proportions. If you're designing your own pattern, our pattern generator can help you create a custom grid from any image. Ironing is the most critical step. Practice on a small test piece first to get a feel for your iron's temperature and timing. Remember that different bead brands may require slightly different settings. Always use parchment paper, never wax paper, as wax can melt and ruin your iron. For more ironing tips, revisit our how to iron guide. Finally, don't be discouraged if your first attempt isn't perfect. Fuse bead crafting is a skill that improves with practice. Start with beginner patterns and gradually work your way up. Join online communities to share your work and get feedback. With patience and creativity, you'll be making stunning animal designs in no time.

Perguntas Frequentes

What are the best fuse beads for animal patterns?

The best beads depend on your preference. Perler, Hama, and Artkal are all popular brands. Perler offers a wide color range, Hama is known for consistent quality, and Artkal has many specialty colors. For animal patterns, choose beads with a matte finish for a more natural look, or glossy for a shiny effect. Our brand comparison guide can help you decide.

How do I prevent my animal fuse bead design from warping?

Warping happens when the beads cool unevenly. To prevent it, iron both sides evenly and let the piece cool completely under a heavy book or flat object. Avoid over-ironing, and always use medium heat. If warping occurs, you can re-iron gently while the piece is still warm and place it under a weight again.

Can I make 3D animal figures with fuse beads?

Yes! Many animal patterns can be adapted into 3D figures. You'll need to create multiple flat pieces and join them using slots or hinges. Our 3D fuse bead tutorial provides detailed instructions. Start with simple shapes like a cube or a box to practice, then move on to more complex animal structures.

Are animal fuse bead patterns suitable for kids?

Absolutely, with adult supervision. Younger children can help place beads, while adults handle the ironing. Choose simple patterns with larger beads (like Hama Maxi) for small hands. Always follow safety guidelines, and keep irons out of reach. Our safety guide for kids has more information.

Pronto para criar seus próprios padrões?

Abrir o criador gratuito
Compartilhar: