Menu

FuseBeads Hub © 2026

Easter Fuse Bead Patterns: Eggs, Bunnies, and Chicks

Create adorable Easter fuse bead patterns with our guide covering eggs, bunnies, chicks, and spring scenes. Includes tips, materials, and step-by-step instructions.

Débutant5 min read de lecture

Why Easter Fuse Bead Patterns Are a Springtime Favorite

Easter is a season of renewal, pastel colors, and family-friendly crafting. Fuse bead patterns fit perfectly into this festive atmosphere because they allow you to create charming, pixelated versions of classic Easter icons—decorated eggs, floppy-eared bunnies, and fluffy chicks. Whether you're a seasoned crafter or just starting out, these patterns offer a fun and relaxing way to celebrate spring. If you're new to the hobby, our guide for beginners will get you up to speed quickly. One of the best things about Easter fuse bead patterns is their versatility. You can turn them into ornaments, magnets, coasters, or even jewelry. For example, a small egg pattern can become a colorful ornament to hang on an Easter tree, while a bunny shape can be glued to a magnet for the fridge. The possibilities are endless, and the supplies are affordable. All you need are fuse beads, pegboards, an iron, and some creativity. Beyond the fun factor, working with fuse beads is a fantastic fine-motor activity for kids and adults alike. It encourages focus, color recognition, and patience. Plus, the finished projects make wonderful gifts or decorations for Easter baskets. In this article, we'll explore a variety of Easter-themed patterns, share practical tips, and guide you through the process step by step.

Essential Materials and Tools for Easter Fuse Bead Projects

Before you dive into pattern-making, gather your supplies. The core materials are fuse beads (also known as Perler, Hama, or Artkal beads), pegboards, ironing paper, and an iron. For Easter designs, you'll want a palette of pastel colors: soft pinks, baby blues, mint greens, sunny yellows, and lavender. A fuse bead color guide can help you choose the perfect shades for eggs, bunnies, and chicks. Don't forget white and black for details like eyes and outlines. Pegboards come in various shapes and sizes. A large square pegboard is ideal for bigger scenes like a bunny with an egg, while small circular or heart-shaped boards work well for individual ornaments. If you're planning to make many small pieces, consider a set of best fuse bead pegboards that includes multiple shapes. Tweezers are also handy for placing beads precisely, especially when working on intricate details. For ironing, you'll need parchment paper or the ironing paper that comes with most bead kits. A dry iron set to medium heat works best. If you're unsure about the ironing process, our how to iron fuse beads tutorial covers everything from temperature settings to flattening techniques. Finally, keep a small bowl or tray to hold your beads—this prevents spills and keeps your workspace organized. For more tool recommendations, check out our recommended tools guide.
Essential Materials and Tools for Easter Fuse Bead Projects

Classic Easter Egg Patterns: From Simple to Spectacular

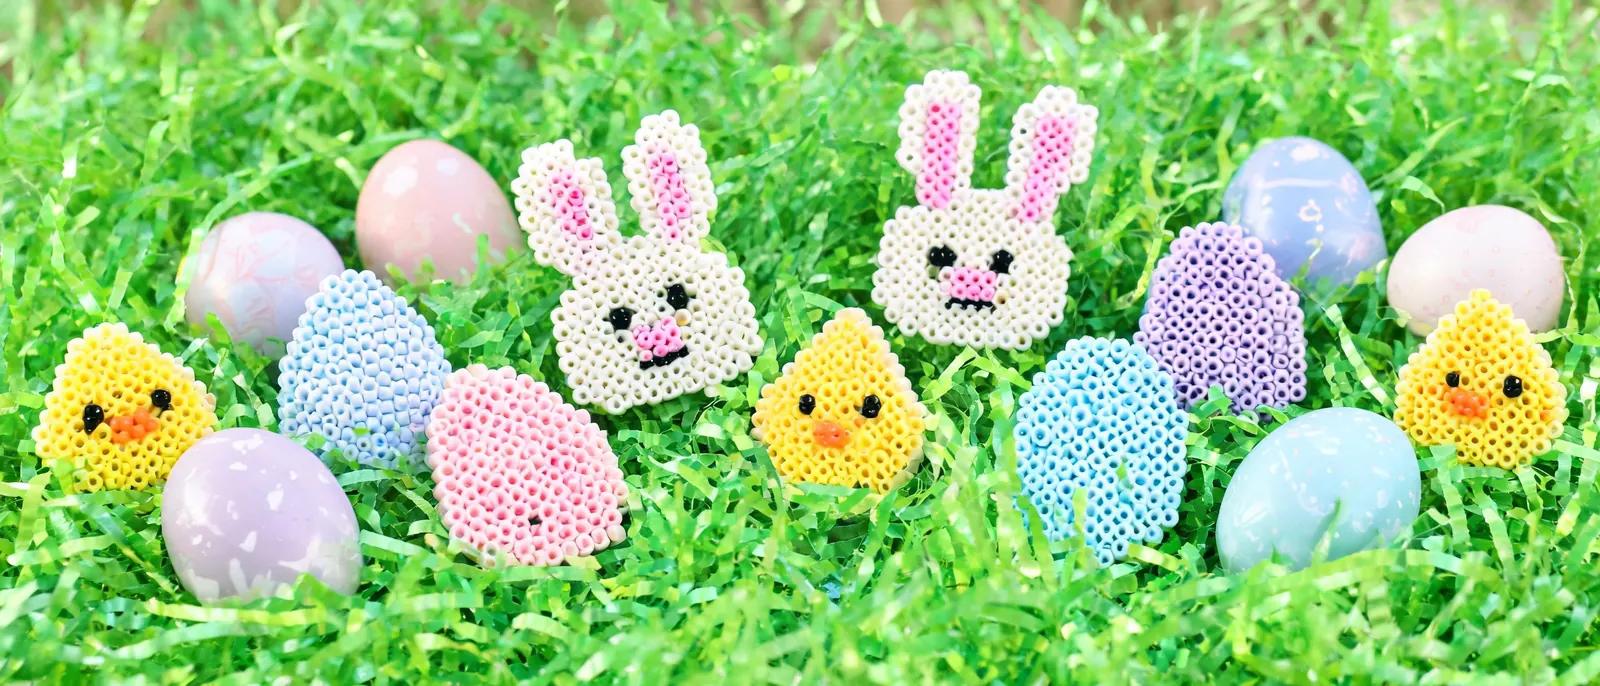
Easter eggs are the quintessential symbol of the holiday, and they translate beautifully into fuse bead art. Start with a simple oval shape using a single color, then add stripes, dots, or zigzags in contrasting pastels. A basic egg pattern might use 30-50 beads, making it a quick project for beginners. You can create a set of matching eggs in different color combinations to display in a basket or string them into a garland. For a more intricate design, try a Ukrainian pysanky-inspired egg with geometric bands and star motifs. These patterns require more beads and careful counting, but the results are stunning. Use a generator to create custom pixel patterns from your own designs or photos—simply upload an image and adjust the size to fit your pegboard. This tool is especially useful for creating unique egg designs that stand out. Once your eggs are ironed, you can turn them into various items. Glue a magnet to the back for a festive fridge decoration, or attach a pin to wear on your lapel. For a practical twist, make a set of coasters by creating larger egg shapes and backing them with cork. You can also hang smaller eggs as ornaments on an Easter tree or a spring-themed wreath. The key is to experiment with colors and patterns until you find a style you love.

Adorable Bunny and Chick Patterns for Easter

Bunnies and chicks are the adorable animal ambassadors of Easter. A simple bunny face pattern uses a round head, two long ears, and a small nose—perfect for beginners. For a full-body bunny, you'll need a larger pegboard and more beads, but the result is a charming figure that can stand on a shelf. Use white, gray, or brown beads for the body, with pink for the inner ears and black for the eyes. Our animal patterns collection has more inspiration for cute creatures. Chicks are even easier to make because of their simple round shape. A yellow chick with a tiny orange beak and black dot eyes can be completed in minutes. You can create a whole flock of chicks in different sizes and arrange them in a nest made of brown beads. For a 3D effect, try making a chick that sits inside a cracked eggshell—this requires two pegboards and some careful ironing. If you're interested in 3D projects, our 3D fuse bead tutorial walks you through the process. To add variety, consider making bunny and chick patterns that serve different purposes. A small bunny can become a keychain for a backpack, while a chick can be turned into a magnet for the fridge. You can also string them together to create a mobile or a garland. The more you experiment, the more uses you'll discover.
Adorable Bunny and Chick Patterns for Easter

Creating Spring Scenes with Fuse Beads

Why stop at individual figures when you can create an entire spring scene? Combine eggs, bunnies, and chicks with flowers, butterflies, and green grass to make a delightful diorama. Use a large pegboard or connect multiple boards to build a scene that measures several inches across. You can depict a bunny hiding eggs in a garden, or a chick hatching under a blooming tree. These scenes make impressive wall art or tabletop displays. When designing a scene, plan your layout on graph paper first. This helps you visualize the composition and count beads accurately. Start with a background of sky blue or grassy green, then add your main elements. Use lighter colors for distant objects and darker colors for foreground to create depth. If you need help with color selection, refer to our color guide again—it's a lifesaver for cohesive palettes. After ironing, you can frame your scene or mount it on a canvas. For a more durable finish, consider ironing both sides or using a clear sealant. These scenes also make wonderful gift ideas for family and friends. Whether you keep them for yourself or give them away, they capture the joy of spring and the Easter spirit.

Tips for Successful Easter Fuse Bead Projects

To ensure your Easter projects turn out perfectly, keep a few tips in mind. First, always work on a flat, heat-resistant surface when ironing. A cutting board or ironing mat works well. Second, iron evenly—move the iron in circular motions and check the beads frequently to avoid over-melting. Over-melted beads lose their distinct pixelated look and can warp. If you're new to ironing, practice on a small scrap piece first. Third, organize your beads by color before starting. This saves time and prevents frustration. Use a bead organizer or small containers. Fourth, don't be afraid to make mistakes. Fuse beads are forgiving—you can rearrange them before ironing or even re-iron a piece if it's not fully fused. For more storage tips, see our how to store fuse beads guide. Finally, involve the whole family. Easter crafting is more fun when everyone participates. Set up a crafting station with multiple pegboards and let each person create their own design. You can even host a friendly competition for the most creative egg or bunny. The memories you make are as valuable as the crafts themselves.

Questions fréquentes

What beads are best for Easter fuse bead patterns?

For Easter patterns, you'll want a mix of pastel and bright colors. Standard midi beads (5mm) from brands like Perler, Hama, or Artkal work well. Choose colors like light pink, baby blue, mint green, yellow, lavender, white, and black. If you're making detailed designs, consider using mini beads (2.6mm) for finer detail. Always check that your beads are compatible with your pegboards—most major brands are interchangeable, but it's best to test a small piece first.

How do I iron fuse beads without melting them too much?

Set your iron to medium heat (no steam) and place a piece of parchment paper or ironing paper over your design. Move the iron in slow, circular motions for about 10-15 seconds, then lift the paper to check the progress. The beads should be fused together but still show their individual holes. If they look too melted, reduce the heat or iron for less time. Always iron on a flat, heat-resistant surface and let the piece cool completely before removing it from the pegboard.

Can I make Easter fuse bead patterns with kids?

Absolutely! Fuse beads are a wonderful craft for kids, but adult supervision is required during ironing. Children as young as 5 can help place beads on the pegboard, which helps develop fine motor skills. Choose simple patterns with large areas of single colors for younger children. For safety tips and age recommendations, read our guide on fuse beads safe for kids. Always keep the iron out of reach of children and do the ironing yourself.

What can I do with finished Easter fuse bead projects?

There are countless ways to use your finished projects. Turn them into ornaments for an Easter tree, magnets for the fridge, keychains for backpacks, or coasters for your table. You can also string them into a garland, glue them to greeting cards, or display them in a shadow box. For more ideas, check out our things to make with Perler beads article. They also make thoughtful handmade gifts for Easter baskets.

Prêt à créer vos propres modèles ?

Ouvrir le créateur gratuit
Partager :