Menü

FuseBeads Hub © 2026

Fuse Bead Emoji Collection: Patterns, Color Guides & Tutorials

Create adorable fuse bead emoji! Smiley faces, hearts, animals & food with color guides, step-by-step tutorials, and pro tips for perfect pixel art.

Anfänger5 min read Lesezeit

Why Fuse Bead Emojis Are Taking Over Craft Rooms

Emojis are the universal language of digital expression, and translating them into fuse beads brings that playful energy into the physical world. Whether you're a seasoned crafter or a curious beginner, fuse bead emoji projects offer instant gratification: they're small, colorful, and instantly recognizable. The rise of pixel art in pop culture has made these tiny bead creations a staple at craft fairs, maker spaces, and DIY gift exchanges. From keychains to coasters, emoji fuse beads add a touch of whimsy to everyday items. One of the biggest draws is the sheer variety. You can recreate classic smiley faces, winking emojis, hearts in every shade, adorable animals, and even tempting food icons like pizza slices and donuts. Each design is built on a grid, making fuse beads a natural fit for pixel-perfect emoji art. The process is meditative and rewarding, and the results are durable enough to be used as magnets, keychains, or ornaments. Plus, with a little creativity, you can scale up or down to suit your project. For beginners, emoji patterns are an excellent entry point because they typically use a limited color palette and simple shapes. If you're new to the hobby, start with our beginner's guide to learn the basics of pegboards, ironing, and bead placement. Once you've mastered a few emojis, you'll find endless ways to incorporate them into larger projects, from coasters to wall art. The emoji trend shows no signs of slowing down, and fuse beads are the perfect medium to capture their charm.

Essential Materials and Tools for Emoji Fuse Beads

Before you dive into your first emoji, gather the right supplies. The core materials are fuse beads (also known as Perler, Hama, or Artkal beads), pegboards, ironing paper, and an iron. For emoji projects, a standard square pegboard is your best friend, but specialty shapes like circles or hexagons can add variety. You'll also want tweezers for precise placement, especially when working with tiny details like eyes and mouths. A bead organizer or storage box keeps your colors sorted and accessible—check out our storage tips for ideas. Color selection is crucial for emoji accuracy. Most emojis use a limited palette: bright yellow for smileys, reds and pinks for hearts, and a range of skin tones for faces. Invest in a good set of beads that includes these core colors. If you're unsure which brand to choose, our Perler vs Hama vs Artkal comparison breaks down the differences in size, melting behavior, and color range. For a deeper dive into color matching, the fuse bead color guide offers charts and tips for achieving the perfect hue. Don't forget the finishing touches. Ironing paper prevents beads from sticking to your iron, and a clean, flat surface ensures even melting. For more detailed guidance on ironing techniques, refer to our how-to-iron guide. Optional but helpful tools include a bead scoop for easy cleanup and a light box for tracing patterns. With these supplies on hand, you're ready to bring your favorite emojis to life.

Smiley Faces and Hearts: Classic Emoji Patterns with Color Guides

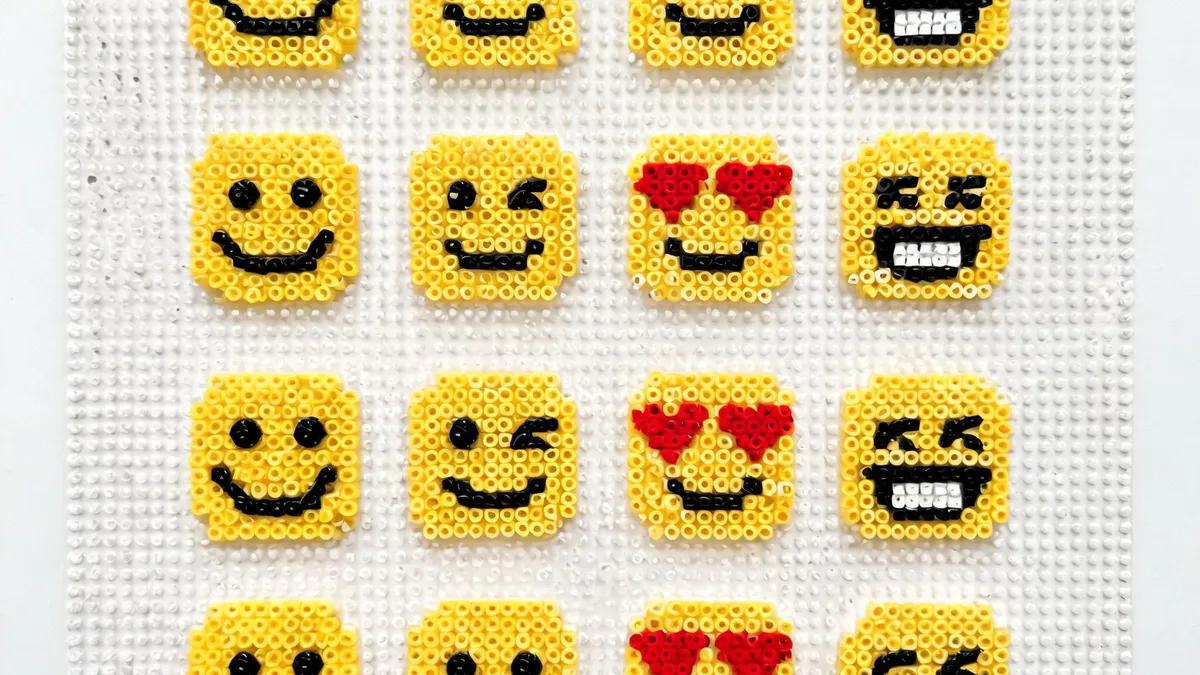
Smiley faces are the gateway emoji for most crafters. The classic yellow smiley is simple yet iconic: a round yellow face with two black dot eyes and a curved black smile. To make it, use a 10x10 pegboard and fill the center with bright yellow beads. Place two black beads for eyes about two rows down from the top, and create a smile using black beads in a gentle curve. For a winking face, replace one eye with a black bead and add a small white highlight. Experiment with different expressions—sad, angry, surprised—by altering the mouth shape. Our cool ideas section has more inspiration for expressive faces. Hearts are equally popular and come in many variations. A basic heart uses red beads in a symmetrical pattern: start with two rounded lobes at the top and taper to a point at the bottom. For a pixel-perfect heart, use a 10x10 grid and follow a template. You can also create broken hearts (add a zigzag line in the middle), sparkling hearts (add white or yellow beads for shine), or rainbow hearts (use a gradient of colors). Color guides for hearts often include shades like cherry red, magenta, and pink for a realistic look. These designs make lovely earrings or gift tags. When working with smileys and hearts, keep your bead placement tight and consistent to avoid gaps. Use tweezers for precision, and double-check your pattern before ironing. A light box can help you see the grid clearly. After ironing, place a heavy book on the design while it cools to prevent warping. These classic emojis are perfect for beginners and can be customized endlessly with different colors and expressions.

Animal and Food Emojis: Step-by-Step Tutorials

Animal emojis add a dose of cuteness to any project. Popular choices include the cat face, dog face, panda, and fox. Let's walk through a cat face: start with a 10x10 pegboard. Use orange or gray beads for the base, leaving space for ears at the top corners. Add two triangular ears using the same color, then place black beads for eyes and a pink bead for the nose. Whiskers can be added with single black beads on each side. For a panda, use white beads for the face and black for ears and eye patches. Our animal ideas page has more patterns to explore. Food emojis are equally fun and often simpler. The pizza slice is a crowd-pleaser: use a triangle shape with a tan crust at the top, yellow cheese, and red pepperoni dots. The donut is another favorite: a circle with a hole in the middle, pink icing, and colorful sprinkles. For a more detailed tutorial on shaping and ironing, check our 3D fuse bead tutorial to take your skills further. These food emojis make great coasters or photo frame decorations. When creating animal and food emojis, pay attention to color blocking and symmetry. Use a reference image or our generator to create a custom pattern. Start with the outline, then fill in the details. Iron in small circular motions to ensure even melting, and don't over-iron—you want the beads to fuse but retain their pixelated texture. With practice, you'll be able to whip up a whole emoji collection in no time.

Pro Tips for Perfect Emoji Fuse Beads

Achieving crisp, professional-looking emoji fuse beads requires a few key techniques. First, always use a fresh sheet of ironing paper and a clean iron soleplate. Set your iron to medium heat (about 300°F/150°C) and press firmly in circular motions for 10-15 seconds. Flip the design and repeat on the other side for even melting. Avoid over-ironing, which can cause beads to lose their definition and become flat. For more detailed ironing advice, revisit our how-to-iron guide. Second, choose the right pegboard for your design. Standard square boards are versatile, but for larger emojis, you can connect multiple boards. Our pegboard guide reviews the best options for different project sizes. When placing beads, work from the center outward to maintain symmetry. Use tweezers for tiny details and keep a bead scoop handy for quick cleanup. Third, consider the final application. If you're making keychains, reinforce the attachment point with extra beads or a small piece of felt. For fidget toys, ensure the beads are fully fused for durability. And always test your ironing technique on a small sample before committing to a larger project. With these tips, your emoji fuse beads will look polished and professional.

Displaying and Sharing Your Emoji Collection

Once you've built a collection of emoji fuse beads, it's time to show them off. Turn them into magnets for your fridge, ornaments for the holidays, or wall art by arranging them in a frame. You can also attach them to notebooks, phone cases, or picture frames using double-sided tape or glue. For a cohesive look, group emojis by theme—smileys in one frame, animals in another—or create a mixed collage that reflects your personality. Sharing your creations with the crafting community is incredibly rewarding. Post photos on social media with hashtags like #fuse bead emoji or #perlerart, and join online forums or local craft groups. If you're looking for gift ideas, our Perler bead gift ideas guide offers thoughtful ways to package and present your emoji beads. You can also host a craft party where friends make their own emoji designs—it's a fun, social activity that appeals to all ages. Remember to store your finished pieces properly to avoid damage. Keep them in a cool, dry place away from direct sunlight, and consider using a display case or shadow box for special pieces. With proper care, your emoji fuse beads will stay vibrant for years to come. So gather your beads, fire up your iron, and start creating your own emoji universe—the possibilities are endless!

Häufig gestellte Fragen

What size pegboard do I need for emoji fuse beads?

Most emoji designs fit on a standard 10x10 or 15x15 pegboard. For larger or more detailed emojis, you can connect multiple square boards. A common size is the 29x29 pegboard, which allows for bigger projects. If you're just starting, a 10x10 board is perfect for simple smileys and hearts. Check our pegboard guide for more recommendations.

How do I prevent my emoji fuse beads from warping?

Warping happens when the beads cool unevenly. To prevent it, iron both sides evenly and place a heavy book or flat weight on the design while it cools completely. Avoid removing the beads from the pegboard too soon. Also, use a consistent ironing temperature and don't over-iron. For detailed steps, see our how-to-iron guide.

Can I use any brand of fuse beads for emoji patterns?

Yes, but different brands have slight variations in size and melting behavior. Perler, Hama, and Artkal are the most popular and compatible with each other. However, mixing brands can sometimes lead to uneven fusing. It's best to stick with one brand for a project. Our brand comparison guide can help you choose.

What are some easy emoji designs for beginners?

Start with the classic yellow smiley, a simple red heart, or a basic star. These designs use few colors and have straightforward shapes. The pizza slice and donut are also relatively easy. Avoid complex animal faces with many details until you're comfortable with ironing. Our beginner's guide has more simple patterns.

Bereit, Ihre eigenen Vorlagen zu erstellen?

Kostenlosen Maker öffnen
Teilen: